Thursday, January 24, 2013

My January Shelf / Mantel

After taking down my nativity scene I needed to put something back up on my shelf. I actually did not go back to how I first decorated my shelf, even though I loved that too. And I'm quite proud of what I came up with considering what I have available.

(I've been a big fan on posting from my phone lately- hope the pictures are okay!)
My grandma gave us those candle sticks as a housewarming present. Eventually I'll get matching candles to put on them!

And that frame was actually from my grandma too. It was just an old one she was going to get rid of but thought I might like it. I was planning on painting it, but decided to use it before I got around it it. I surprised myself, but i think it looks pretty cool just the way it is. Anyway, that frame sat empty for a couple of weeks. I finally decided to add something to it a couple of days ago.

I had printed that quote a while back (it's no longer available - sorry!) and added some glitter to it. In order to hang it in the frame. I added some bakers twine to the back of the frame and hung up the print with a binder clip (it's what I had available!) I covered the binder clip with a ribbon to hopefully make it not look so out of place!
Not too bad, right? I'm just proud that I've switched it up 3 times already! :)

Tuesday, January 22, 2013

How to Make a White Light Bulb Colorful

I like changing our front light outside to match the season, so with Valentine's Day coming up I really wanted a pink light bulb. Well, Menards didn't have a pink one. I know, how awful.

So I grabbed a plain white one and colored it with a sharpie. Using one color seemed to boring so I ended up using two colors and made stripes of some sort (which are kinda hard to do on a twisty light bulb).
Color a light bulb pink

Make a light bulb colorful

It looks great when it is turned on - perfectly pink! However the pictures don't show it well for some reason. For some reason you can't really see the color on the bulb but you can see the pink light it gives off. If you're curious what the light looks in real life just stop by and see it in person and you'll love it I promise!!
(Or make your own - you probably have the supplies already, right? Love these kind of simple projects.)
Pink light LOVE!

Sunday, January 13, 2013

My Stenciled Wall - Harlequin Trellis

So it took me a few months, but I {finally} stenciled a wall in my living room over Christmas break. I am in love with how it turned out! Why did it take me to long to do it?! It was so hard to decide which wall in my house to stencil because I don't have many nice small rectangle walls and my family room has wood paneling so that wasn't an option. So I did the random wall to the right when you walk into our house.
My stencil is from Cutting Edge Stencils and I won it from one of my favorite DIY bloggers - Sam at The Junk House. The stencil I choose was the Harlequin Trellis Allover Stencil. The background wall color is Comforting by Behr and the stencil color is Metallic Silver by Martha Stewart.
Silver metallic paint
Metallic paint is so much fun! So glad I choose that after MUCH debating over what color I would use. Surprisingly, it didn't even use half of the paint to do the entire wall! So, I have a lot to use on other projects...hmm. However, it is really difficult to take pictures of because it reflects light, but that's what I love so much about it in real life!

It took about 4-5 hours to complete. And that was with my standing back and admiring my work after each stencil and also "erasing" a few sections when I decided they looked funny or didn't match up perfectly. (The paint was actually pretty easy to wipe off even after being on the wall for 10-15 minutes!)
You can see in the progress pictures that the stencil does not go directly to the corners. Well, thankfully Cutting Edge Stencils gives you three stencils - the large one, and two smaller ones to help fill in those smaller areas.
Stenciling a wall
Painting the corners was the most difficult part of this project for me. Cutting Stencils recommends to bend the stencil so you can reach the corners, but this was really hard for me - probably because I didn't have any help.
Cutting Edge Allover StencilCutting Edge Allover Stencil - painting corners
After a little self convincing talk, I decided to cut the small stencil so that it would line up nicely against the wall. See the difference that made in the pictures above. It saved me a lot of time and frustration and probably some tears too. Just being honest here!

Isn't my wall beautiful?! I could just stare at it forever :)
 Do you like our little snowman?! It was a Christmas gift from our neighbors. His name is Francis.
Cutting Edge Stenciled Wall
We're dog sitting for my in-laws right now as they are in Italy. JEALOUS! Anyway, Raphie likes Francis too.

Have you ever stenciled a wall? Please share!

The same day I was painting this wall my in-laws brought over this china cabinet for us! I love having a spot to put some of our pretty glass/crystal items - which mostly from our wedding :)
I was really frugal in my wedding planning adventure - but one thing I splurged on was this gorgeous cake topper from Gina Freehill:
Gina Freehill "Embrace" Wedding Cake Topper
Sigh. It is so beautiful. I get so happy every time I see it. The couple just looks so intimately in love; I love the way the guy is holding the girl. Plus, many of my friends said this figurine reminded them of Kevin and me too. Down the side it says "This day I will marry my friend, the one I laugh with, live for, dream with, love." I love Gina's entire Language of Love cake topper collection - check it out if you're getting married! It was almost as much as my wedding dress (granted, I got a really good deal on my dress, so it really wasn't THAT expensive!) I'm really happy it's no longer in hiding in our closet. Also our toasting flutes are "Waterford Wishes Happy Celebrations" and were a bridal shower gift - I put them on our registry even though I knew they were ridiculously expensive, but I just loved them so much, so that's another kind-of splurge that I am so happy to display!


Sunday, January 6, 2013

Foxy the Fire Dancer and Cabana Bob - Murder Mystery

My hubby and I attended a murder mystery party a couple of months ago, Murder in Margaritaland. You might remember, we also went to one in March as a french maid and butler. My husband's high school friends seem to be on a murder mystery kick! :) It's fun though!

For this murder mystery party, hubby had the role of "Cabana Bob." Easy costume for him - a Hawaiian shirt, shorts, and a lei. I received the role of "Foxy the Fire Dancer." Really?! Well, here's what we came up with:
Foxy the Fire Dancer and Cabana Bob - murder mystery party
So finding a costume was an adventure. We went everyone looking for a grass skirt. You would think we'd be able to find some leftover Halloween costumes considering it was just a week after Halloween, but nope, too bad I didn't start looking sooner.
                         
I then decided I would make a hula skirt out of crepe paper. I taped the paper on the belt and....it looked ridiculous. See picture below....it looked too bad on to even take a picture of it wearing it!
Hula Skirt Crepe Paper
By this time we had about an hour before the party, so after some google and pinterest searches, it was time to get creative. I went with the basic fire dancer outfit - baggy pants, tight shirt, and face paint. Okay, I actually used lipstick, but it did the job. I was laughing at myself so hard while I was painting my face - wish you could have been there. What an adventure :)

I added a braid in my hair and a red lei (oh, and a red DIY hair tie on my wrist). So - even though I didn't have the skirt or the headdress, I feel like I made it work. I also found some sweet glow sticks at the Dollar Tree to act as my torches. They were fun! I can't believe how much light they actually give off.

The party was fun. I don't want to give anything away in case you end up going to this one as well, but we had lot of yummy food and had a good time hanging out with friends. Everyone was very creative in their outfits and we all stayed in character most of the time. Also, thankfully I didn't die like last time!


Thursday, January 3, 2013

Old Sweater into Leg Warmers

DIY leg warmers made out of a sweater 
I'm so excited to share this mini DIY leg warmers project with you because it is so easy, it took me all of 30 seconds!

Projects to do with an old sweater
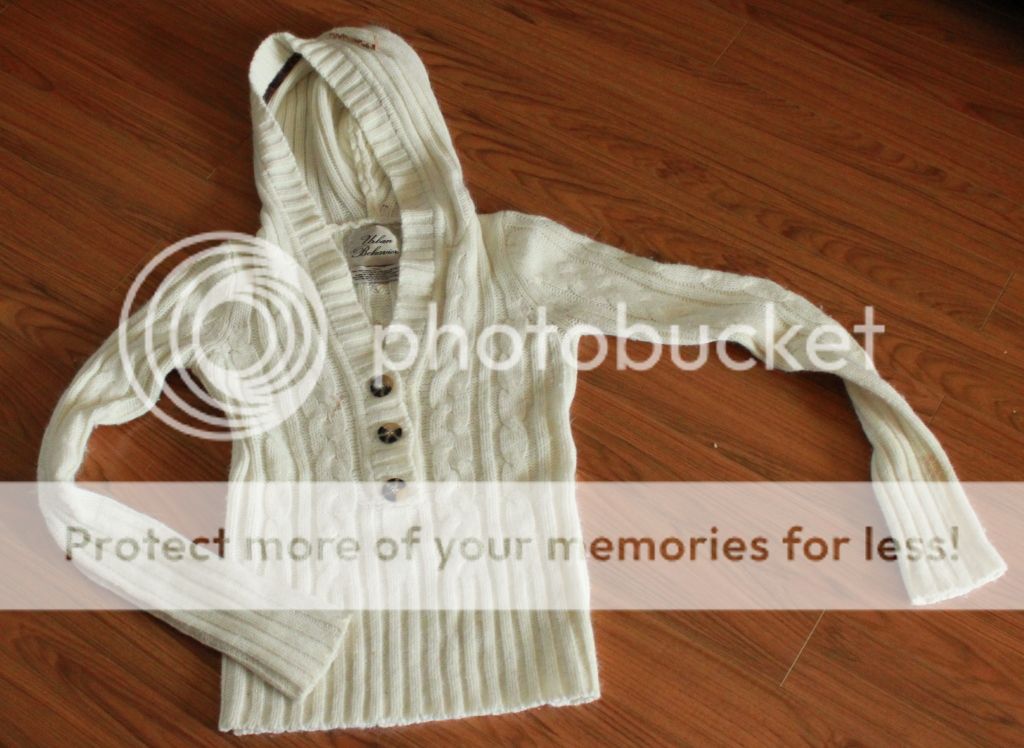
Inspiration: This old short sweater with stains.

So, project #1 with the sweater involved chopping off the sleeves and putting them on my legs. Make perfect sense of course. (Since the bottom of the sleeve is already finished, I wear that part on the top and don't worry about the bottom since that will be covered by the boot anyway.)
Photobucket Photobucket
Okay, I don't walk around like this...but don't you love my Christmas socks? :) I might recommend wearing these leg warmers only when you plan on keeping your boots on. haha

Yay for leg warmers that look so cute with my boots!
Sweater sleeve leg warmers to wear with boots - no sew DIY
(Yes, I cropped my head out on purpose. I promise it looks cuter this way)

What else should I make with my sweater??

I'll be hosting an awesome giveaway with a few of my favorite things as soon as I reach 400 GFC followers! I'm at 389 right now so it will be soon! Be sure to follow me if you don't already :)


Related Posts Plugin for WordPress, Blogger...
Blogging tips