

Sunday, November 25, 2012
Wedding Invitation Christmas Ornament
My mom made my husband and I this homemade ornament for our first Christmas as a married couple last year.
What's so special about it? It's our wedding invitation! Really easy to make too.
Cut up a wedding invite into small strips, curl them up, and shove them inside a clear ornament. I love mine - I always make people guess what it is!
Saturday, November 24, 2012
Some exciting updates:
It's been a while, so here's some short updates:
We put our Christmas lights and Christmas tree up last Saturday!
I made my very first turkey on Sunday. All. By. Myself! And it was good too. We had my very pregnant sister-in-law and her husband, and my friend Rita, over for an early Thanksgiving dinner.
Then, my sister-in-law and brother-in-law had their baby on Wednesday! She's adorable and I am such a proud aunt. We got to visit twice in the hospital and we decorated their house with "it's a girl" items to surprise them before they got home. I also bought some little headbands to give to her today! Everyone is healthy and doing great.
Thanksgiving was yummy. Gobble gobble! We were able to spend time with both my husband's extended family and my own which was really nice.
Black Friday - just went to Kohl's to use a $10 off coupon, got a few candles. And then at night, I got an iPhone and a new Chicago-land area phone number! Good-bye 616 number, I will miss you. (The case is from Five Below in case anyone is wondering.)
 To go with my new iPhone, I got an instagram account! Follow me HERE!
And after all that excitement, I have nothing left to share with you. :) Hope you are all well.

We put our Christmas lights and Christmas tree up last Saturday!
I made my very first turkey on Sunday. All. By. Myself! And it was good too. We had my very pregnant sister-in-law and her husband, and my friend Rita, over for an early Thanksgiving dinner.
Then, my sister-in-law and brother-in-law had their baby on Wednesday! She's adorable and I am such a proud aunt. We got to visit twice in the hospital and we decorated their house with "it's a girl" items to surprise them before they got home. I also bought some little headbands to give to her today! Everyone is healthy and doing great.
Thanksgiving was yummy. Gobble gobble! We were able to spend time with both my husband's extended family and my own which was really nice.
Black Friday - just went to Kohl's to use a $10 off coupon, got a few candles. And then at night, I got an iPhone and a new Chicago-land area phone number! Good-bye 616 number, I will miss you. (The case is from Five Below in case anyone is wondering.)

And after all that excitement, I have nothing left to share with you. :) Hope you are all well.
Sunday, November 11, 2012
A New Room for our House - We Finally Furnished our Living Room!
The first step was getting rid of the curtains that were left for us. The striped ones were there when we moved in and when we went up to Michigan for the weekend we put up the white ones to give our house a little more privacy. Since the white ones looked crazy, it really gave me motivation to get us new curtains.

I was planning on using the same rod, even though I didn't like it much. But then we found a beautiful rod on clearance at Bed Bath and Beyond (usually $50 for just $25!) And of course, we used a 20% off coupon (Do you know they never expire? It's true! Save those coupons no matter what the date!) which made the rod $20 - totally worth it. It's so pretty!

It was so difficult picking out curtains. I think we made an okay choice - but I'm keeping the packages in case we change our minds! They are a little short...and I'm just not sure if it's the look I was going for. But, I do like them. So, I'll leave it up and see if I change my mind! Your advice/input is always welcome! Also, I didn't really want to, but I think we might still want to add blinds. The curtains do give some privacy, but you still can see in.

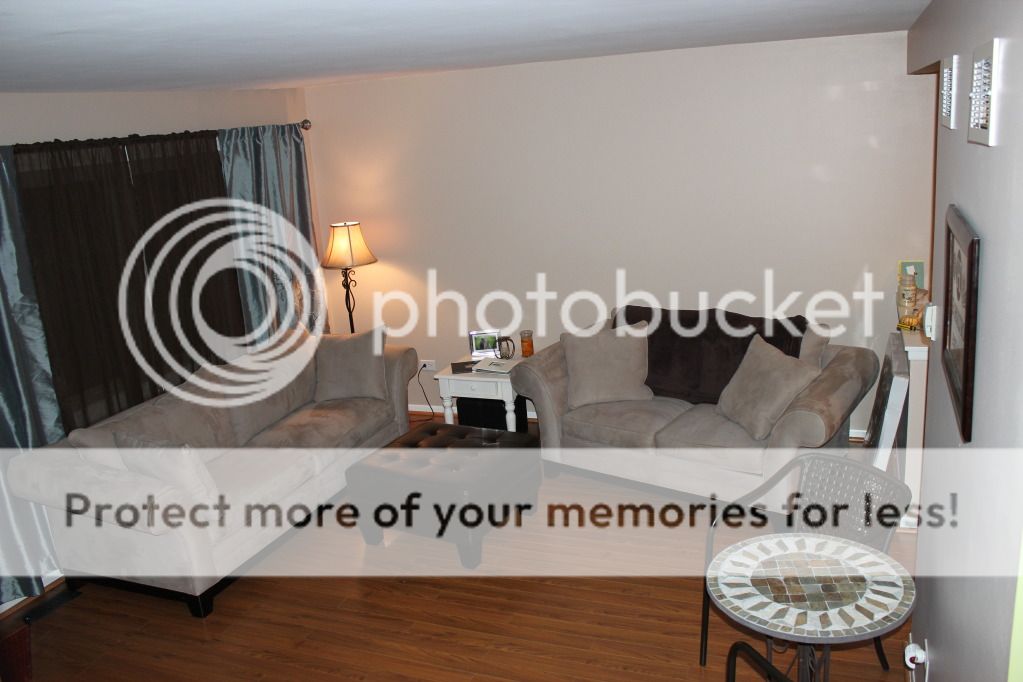
After putting up the curtains, I spent a while on Craigslist searching for some furniture. We've been looking since we moved in but all of a sudden I was really motivated! We found some beautiful couches just 15 minutes away and were able to convince a friend to pick them up for us in his truck. I so wish I had a truck...but at least I have friends who do! LOVE our couches! They are so comfy and pretty and go well with our curtains! :)


Love the couches, however they are very similar in color to our walls. The couch is in front of the curtains so it looks fine there, but the loveseat looked a little odd in my opinion. I added a blanket over the top of the loveseat and now I think it's perfect!

Remember this little white end table? Works great right here for now!

I brought the bistro set in from outside, and instead of putting in the shed, think it looks pretty cute in this room. At least, until it's time to put up the Christmas tree!!

Also, I picked up this clock at Burlington Coat Factory. Trying to figure out where might be the best place for it...or if it's too big for our little house!

And there you have it! I love our new room! The couches are comfortable (I love that you can remove the back cushions too) and our house feels so much bigger because it really seems like we have another room.


Sunday, November 4, 2012
DIY {No Crease} FOE Hair Ties
Have you heard about the new fold-over elastic, no snag, no crease hair ties? Also known as Emi-Jay hair-ties? Apparently they are the new cool thing. To be honest, I thought they looked weird the first few times I saw them, but it was one of those things that grew on me. Plus, hearing that they don't leave those annoying hair-tie marks in your hair and don't give you ponytail headaches made me want to try them out!


These are addicting to make and easy. In two days I used up 17 of my 20 yards (the other 3 yards won't work well for the hair ties, so that's why I didn't use them).
And, of course I had to display them cutely. I had fun matching colors that I felt looked good together. And now I have a hair tie for every outfit :)


Subscribe to:
Posts (Atom)
