Showing posts with label Crafts. Show all posts

Monday, June 10, 2013

Chevron Painted Bulletin Board


A while ago I picked up a bulletin board from the curb. It was in pretty bad shape but I figured I'd be able to do something fun with it.

And recently, I have fell into the chevron craze. And I've fallen hard. I know I'm late but it' just so cute!!! How did I not see it before? I currently want everything to be chevron!

Unfortunately, chevron isn't the easiest thing to paint. (Why couldn't I just be obsessed with stripes or solid colors?!) I started to draw a grid with pencil on my bulletin board by tracing a sticky note pad. Then I drew in the diagonals of each sticky note box. I used a tissue box as my straight edge and oddly enough, it was the perfect size (weird, right? I like to think of it as resourceful!). So after a few lines, I stopped tracing the sticky note pad and just used it to put the tissue box in position. Confusing enough??? I don't know, but it worked for me!

After all of my diagonals were penciled in and I had my chevrons, I started painting them in. I was going to do multiple colors, but then I liked the way it looked with just one. Did you see my instagram "in progress" picture? If not, maybe you should follow me on instagram @breezybriejoy! Exciting stuff, I tell you!

Oh, I also painted the frame blue. I used the Americana acrylic paints - "Mulberry" and "Deep Midnight Blue" that my mom picked out for me. Good job mom!
I had some extra space on the bottom because my bulletin board didn't have equal post-it note spacing... This made the other side look silly. I painted in the little triangles at the bottom and that helped.


 (sorry about this last picture being a crappy phone picture...I had already uploaded the other pics on my computer and was too lazy to do it again!)

And now it's just chilling on this rack thing in my garage. I might hang it up some day...but we'll see! Currently featured on our bulletin board is Lydia, the girl we sponsor, our adorable niece Heidi, a save-the-date for our best friends who are getting married on October 5 (we set them up), a wedding picture (it will be two years tomorrow!), and a card we got when we moved into our new house.


Monday, April 22, 2013

How to Print on Burlap and a Personalized Wedding Gift

As you all know, I love to give personalized gifts, and now that I've learned how to print on burlap, I can give even more personalized gifts! In fact, I feel bad for the weddings I went to before I got this creative! After doing many google image searches Friday night, I found this adorable burlap printed sign, personalized of course, and I thought I could totally do that! Sure enough, it was actually pretty easy!
Personalized Cheap Wedding Gift
The shower was the next morning, and I didn't have any burlap (or ink) but it was already 7:30 and Grimm was on at 8:00 so I was kinda cranky going out to get my supplies. Thankfully, I had already bought this frame while it was on clearance because I thought it was so beautiful and knew I'd use it eventually. The Burlap was $3 for a yard at JoAnns and ink for my printer was $23 $16 at Best Buy (I price matched using my Shop Savvy app, and got my ink for $16 instead - best app ever, download it now if you don't have it already!) Anyway, I got home just a few minutes after 8:00 excited that I had shopped so fast, but alas, Grimm wasn't on because of the coverage of the Boston guy in the boat...

Okay, now onto the tutorial. First, cut your burlap to the same size of your card stock printer paper, 8 and 1/2 by 11 I believe it is. The easiest way to cut burlap is to pull out a strip as your cutting line and cut along that. I learned that while I was making the burlap wreaths for my friend's wedding.
How to cut burlap

Tape the burlap to your card stock (I used masking tape). I read so many tutorials that used various adhesives but that sounded messy and like too much work, so I guessed that tape would keep it in place good enough...and it did!

I designed my print on Mircosoft Word. And then I was ready to print! The first time it failed. Not sure why, could have been because it was a new ink cartridge? Or because I tried to mess with the paper type settings? So I tried it again on that same piece and it worked. I had changed the printer setting to plain paper too, so that might have been it.
DIY Wedding / Bridal Shower Gift

At least I had it figured out, the next one printed beautifully!
How to print on burlap

I had a hard time decided whether or not the burlap should be inside the mat, or outside of it, but then I decided I liked the more rustic look of it on the outside, so I went with that. And of course, they can always change it if they like the other way better. Which do you prefer? Inside? Or out?
Personalized Name Burlap Gift 
 Personalized Burlap Wedding Print 
I pulled out strings on the sides of the burlap to make it even, and then put a little glue on the corner so it wouldn't continue to fall out...but really, once it's in the frame you don't need to worry about that. Oh, and I just used scotch tape to keep it in place inside the frame.
Personalized Burlap Tutorial 

It's just so beautiful, right?! I was telling my husband, it's a good thing it has their name on it, because I really want to keep it for myself!!
Personalized Burlap Print
And the bride and groom (and everyone at the shower) loved it! This is definitely getting added to my favorite wedding gifts and shower gifts list. Success!

If you would like a personalized burlap print to give as a gift, but don't have the time/resources to make it yourself, I would love to help out! Contact me for more details :)

Wednesday, April 17, 2013

Washi Tape Clothespins

I finally got washi tape! And the first thing I decided to put it on was some clothespins. Really, there are so many uses for clothspins, but they just have to be cute!!

And if you're looking for washi tape, Michael's had a really good selection, oddly enough, Hobby Lobby only had about 4 different kinds.
Washi Tape Clothespin / uses for clothespins   
(I apologize because these last two posts have had just iPhone pictures...but it's just so much easier! And I used the app Phonto for text - it's amazing and free)

I don't think this really needs a tutorial, but pretty much all you need to do is cut the tape the length of the clothespin and then fold over the excess tape over the sides of the clothespin. This was easier than cutting the sides of the tape, and I think it looks cuter too. Win win! This was my first experience with washi tape and I definitely want to get some more. It's just so fun!

And what can I use the clothespins for? Well, here's what I'm thinking so far...
  • Chip clips (my main reason for doing this - so many bags to seal up in order to keep things fresh, and obviously more than just "chips")
  • Photo holders (like I did here)
  • Magnetic photo / paper clips (glue a magnetic on the back and stick to the fridge)
That's all I got for now. Do you have any other ideas for how I could use clothespins? I do have a bag of 50...


Wednesday, April 10, 2013

Etched 9x13 Bridal Shower Gift

Last Saturday was my sister-in-law's 1st (of 3) bridal shower. I made her my favorite wedding/shower gift to give - a personalized etched baking dish. I am a HUGE fan of personalized wedding gifts and they were always my favorite ones to receive. Plus, I feel like it's easier to remember who gave you unique gifts rather than ones from the registry, just saying.

I added a few more fun goodies to this 9x13 glass dish. See the dish brush? It has a face and its holder is a black dress! :) Too fun! And who doesn't need kitchen gloves with a bright green flower attached? Clearly, I'm a very practical person when it comes to the kitchen.
Etched Pyrex Glass Dish
For more info on how to DIY glass etching, see my tutorial here. I had fun with this last name, since it is so short, I was able to do it nice and big! But they are so many possibility with glass etching. Someday I want to do on 3 letter monogram etched, that would look super cute too.

And the shower went beautifully, but I didn't get any pictures with me in it...except for this one that I didn't even know was taken until I saw it on facebook. But I'm using it because this post needs another picture and I like my outfit! Ha. I'm on the far right with the adorable blue bubble necklace.
I have another DIY wedding/shower gift in mind that I hope to get working on soon and showing you as long as it turns out! Do you give any personalized gifts for weddings or other events? I would love to hear your ideas (feel free to share links to tutorials too!)

Sunday, April 7, 2013

Super Easy Stenciled Rug

A couple of months ago Menards had memory foam mats free after rebate, so of course I got a couple. However, even though they are super comfy, they aren't too exciting looking. I wasn't sure how paint would look on the rug since it's so furry, but I decided to try anyway, and I'm so glad I did! It's so cute!!
Stenciled Memory Foam Bathroom Mat
Yup, you read that right, took me all of 5 minutes!

Martha Stewart stencils 
I used Martha Stewart reusable stencils. I might just have to get some more. They are super easy and simply AMAZING! I used Martha Stewart Satin Sea Lavender paint and mixed it with fabric medium since I was painting on fabric.
Stenciling on Rugs
For the first one I did, I painted over the stencil with my foam brush. Bad idea! The paint seeps under the stencil easier that way. Dab, my friends, dab, and it will turn out so much better! Can you tell which one I did first?

As soon as you're done painting you can peel the stencil off and place it in the next spot. Super easy. If you accidently get some paint on your rug, wipe it down with water before it dries and you'll be good.
 photo IMG_6100.jpg Memory Foam Bathmat Stenciled 
When you're done, rinse your stencils and brush out, put the stencils back. If you notice you went over your stencil like I did, you can "erase" those spots with some water!

Now, step back and enjoy your fun new mat! (Well, maybe let it dry first because if you put it in the bathroom right away because you can't wait to take a picture your husband might step on it and smear the paint, just saying!)
Super Easy Stenciled Bathroom Rug
Seriously - 5 minutes. Maybe not even that long :) These stencils could be dangerous. Hm, what else could I stencil...


Monday, April 1, 2013

Covering up an Ugly Phone Jack Wall Cover & Happy Easter!

Happy Easter everyone! Okay, I know I'm a day late, but I'd rather celebrate Easter then April Fool's Day! :) I have an awesome project to share with you, but before I show you how I made my awesome shoebox phone jack cover....

...let me tell you a little bit about my Easter!

If you follow me on instagram you know I went to Michigan for Easter. We had a really nice time with my family up there :) Here's a couple of the non-instagram pictures of the weekend. 
 Dying Easter eggs. We had maybe a little too much fun doing these, as my little sister Kayla decided to peel eggs and then color them...and then we also colored a dozen non-hard boiled eggs because we finished the boiled ones but then weren't quite ready to be done!

 And here we are all dressed up for church. (I'm wearing my new dress) He is risen! How awesome is it that our Savior died for us and then conquered death as well! Gets me excited, our God is awesome!

Amidst all of the Easter fun, while I was at my parents house I wanted to do some sort of fun crafty project, so when I saw their ugly, unused phone jack on the wall the wheels in my head started spinning (what a weird phrase, right?) 
Ugly phone jack that needs a cover!
Phone jacks are tricky to cover up because they aren't flat so you can't just stick a picture over them. And as far as I know, you can't just rip them out of the wall (but I'm not a electrician or someone who would know better) so I kept thinking of another way that might work.
 At first, I thought a small canvas might cover it up, but my mom didn't have one of those lying around. But - she did have shoeboxes and their lids! I don't even know how I thought of using a shoebox, but I'm quite proud of this creative mind God gave me :)
Cover a phone jack with a shoebox

Anyway, so I stuck a shoebox lid on top of the phone jack. It fits! An easy solution to an ugly phone jack on the wall!
Phone Jack Wall Cover
I spray painted the sides of the shoebox black. Added scrapbook paper and distressed the edges with a black stamp so the paper would look like it belonged.
Shoebox Wall Phone Jack Cover
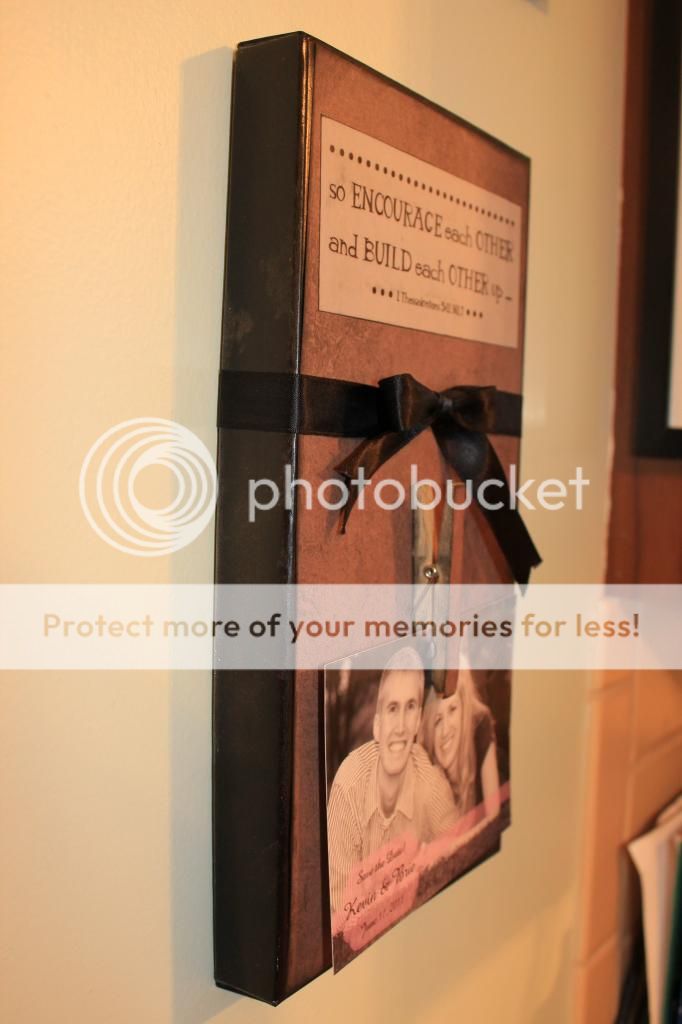
 I tied a ribbon around the middle, but couldn't have the ribbon go all the way around the shoebox, because then it wouldn't fit around the phone jack, so I cut the ribbon in half and hot glued each half to the inside of the shoebox before tying it into a bow. 

My mom had vellum quotes, so I picked one out and glued it on. 
encourage each other - shoebox wall canvas

Also added some scrapbook paper to a clothespin. I added our Save the Date (from 2 years ago!) to the clothespin because my mom still had it on the fridge and it was the right size :) The best part about using a clothespin is that the picture is easily switched out. I even changed the picture before I left to one of my other two sisters, this corner was a little too much "Brie!"
Shoebox Phone Jack Cover

Hope you enjoy it Mom! :) So much cuter than an nonfunctional phone jack cover!!
How to cover or hide a phone jack wall outlet 
Do you have an unused phone jack that needs some covering up? Or have you covered up one another way? Hope this gave you an idea!!

Wednesday, March 27, 2013

Burlap Bubble Wedding Wreaths

How adorable are these burlap wreaths? My friend Melissa will be using them in her wedding this October. I had so much fun helping her make these yesterday (we were both enjoying our Spring Break - yay for having teacher friends to hang out with during break!). She is a very creative one!
Burlap Ribbon Wedding Wreaths

We cut each strip 5 inches wide and the entire length of the burlap we had. Melissa taught me a sweet way to cut burlap. After measuring, she pulled a string from the burlap, bunched the burlap up, and then when she pulled it back down, there was a nice straight line to cut on.

Cutting Burlap

We used jewelry wire to fasten the burlap onto the wreath, and continued bunching and fastening around the ring. Here's it after round one:

This is what the back looks like: (messy, yes, but it works)
 Continue until you cover the entire thing. And...

The front of the wreath
(see those spaces in between the burlap bubbles, we fixed those with some hot gun magic)

The back of the finished wreath

We added letters to spell out "I DO" since she is using these for her wedding, but with some other decorations, it would look great in a house! In fact...I'm thinking about making one for myself. We'll see :)
Burlap Bubble Wreaths 
I'll try to give you an update in October with how they looked at the wedding!


Monday, March 18, 2013

My Spring Bunny Shelf

 So spring officially begins in just a couple of days. And it's been snowing/sleeting out pretty much all day. Yuck! And to think last year at this time it was in the 80s...

Anyway, since I was getting excited for spring, I updated my shelf for Easter / Spring (and spent $0 doing it!) If you count everything I've bought in the past I spent $6. I know I don't have a lot of stuff, but here's what I did with what I have.
Spring Bunny / Easter shelf

I didn't even use a cutting machine for my bunnies! I printed off a bunny picture and then cut it out with an Xacto knife. I trimmed the bunny with a regular scissors after that.
1st step - print bunny on cute paperstep 2 - cut out the bunny with an xacto knife
step 3 - fix up the crazy lines from the xacto knife
I thought I would do something with both the purple and yellow bunnies...but so far only the yellow ones made the cut!
Of course I added some glitter with some Elmer's glue!


 photo IMG_6046.jpg
easter bunny silhouette with glitter 
And that's my glitterful bunny! Both frames I planned on painting when I got them, but ended up leaving them the way they were...and I actually have started to like them!!
 
easter bunny cutout in a frame + jelly bean "bunny poop"How cute is that little bunny peeking out of that frame?!

The frame was $1 at a church sale. I bought the "SPRING" blocks at a thrift store last year for $2. And those are real jelly beans, aka bunny poop, that I added for kicks and giggles.
And did you notice that I finally got matching candles for my candlesticks? $3 at Hobby Lobby with a 40% off coupon.
Spring / Easter Simple Shelf or Mantle Setup
Who else is ready for spring and bunny rabbits? I've already seen a few real bunnies in our neighborhood and they are just too cute!


Related Posts Plugin for WordPress, Blogger...
Blogging tips